Your WordPress site is hacked. Customers can’t reach the WhatsApp link in your bio. Mobile Money payments are stalled. You need action, not theory — and you need it in the next 60 seconds.
This guide is the playbook we walk Ghana, Nigeria, and Kenya business owners through when their WordPress site is compromised. It uses free tools, the malware scanner your hosting account already includes, and a clear decision tree so you don’t burn hours on the wrong path.
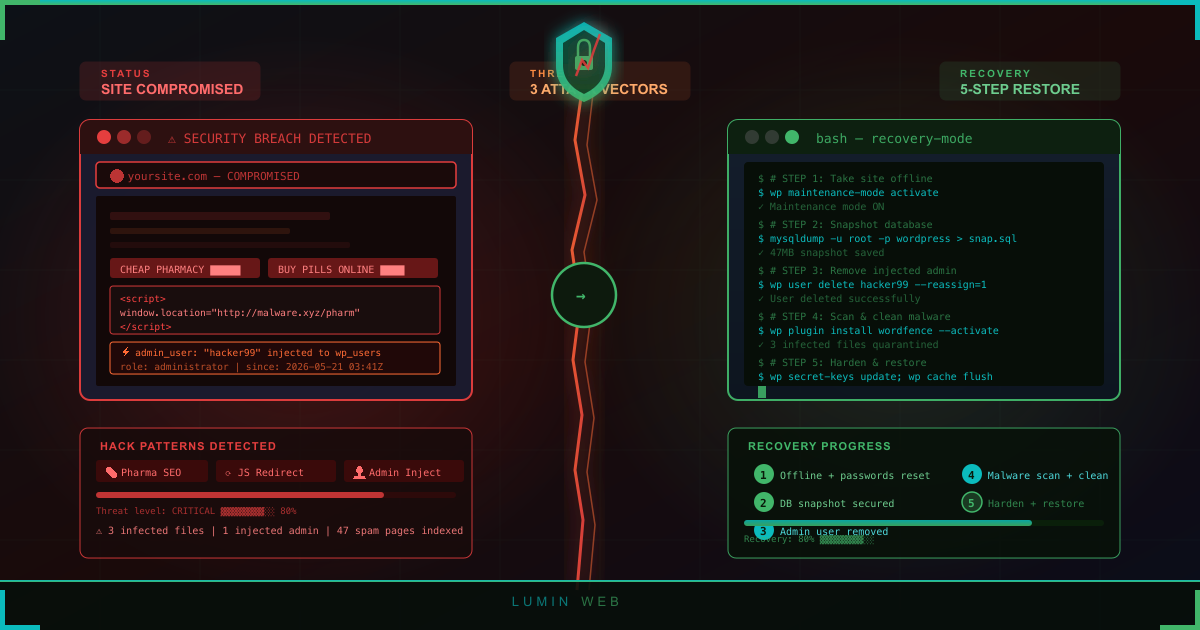
SITE HACKED? DO THIS FIRST (60 seconds)
- Take the site offline. SFTP into your site root and add
Deny from allto.htaccess— or rename the file to.htaccess-broken. Visitors see a 403 instead of malware.- Change every wp-admin password. Reset from the hosting control panel, not from inside WordPress (the attacker may be logged in too).
- Revoke all active sessions. Open
wp-config.phpand replace theAUTH_KEYblock with new values from the WordPress salt generator. Every session — yours and theirs — logs out.- Snapshot the database before any cleanup. Use the backup tool in cPanel or DirectAdmin. Label it
infected-YYYY-MM-DD. This is your forensic baseline.- Write down exactly what you saw. Redirect? Pharma pop-up? Defaced homepage? Hosting suspension email? You’ll need this in 10 minutes when you diagnose the pattern.
No clean backup? Here is what to try first before you assume the site is lost.
Once those five moves are done, the rest of this guide expands them into a full recovery path. You’ll diagnose the hack pattern (Pharma SEO, JavaScript redirect, or admin user injection), clean the site, harden it, and get back online.
How Do I Know If My WordPress Site Is Actually Hacked?
Not every problem is a hack. A white screen is usually a plugin conflict. A 500 error is often a PHP version mismatch. Before you panic, confirm the signs.
The official WordPress.org recovery handbook lists seven Indicators of Compromise — clear signals that someone has broken in:
- Your site is blacklisted by Google or Bing in search results
- Your hosting provider has disabled the site
- The site is flagged for distributing malware
- Visitors report antivirus warnings when they load your pages
- You receive notices that the site is attacking other sites
- Unauthorized user accounts or unexpected file changes appear
- Visible defacement shows up when you load the homepage in a browser
An Indicator of Compromise is just security jargon for evidence that something hostile has happened. If you see one or more of these signs, treat it as a confirmed hack and start the recovery flow below.
Why WordPress Sites Get Hacked
The attack surface has grown sharply. In 2025, 11,334 new vulnerabilities were discovered in the WordPress ecosystem — a 42% jump over 2024. Of those, 91% were found in plugins, with only six low-priority issues in WordPress core itself.
The takeaway is simple: WordPress core is not the weak link. Plugins and themes are. Every plugin you install adds code your visitors run, and every outdated plugin is a potential door.
Speed matters too. The median time from vulnerability disclosure to mass exploitation in 2025 was just five hours. An unpatched site can be compromised before most owners even see the security alert email. To shrink that window, start with our guide on how to audit your WordPress plugins for security vulnerabilities.
The 3 Most Common WordPress Hack Patterns
Almost every hack we see on shared hosting in Ghana and Nigeria falls into one of three patterns. Identifying yours is the difference between cleaning the right files and chasing ghosts. Read the symptoms first, then jump to the matching removal block.
Pharma SEO Hack: Pharmaceutical Keywords in Your SERPs
Symptoms. Your site suddenly ranks in Google for pharmaceutical keywords you’ve never used — Viagra, Cialis, online pharmacy phrases. Searching site:yourdomain.com reveals dozens of pages you didn’t create. The pages may be invisible when you visit them directly (cloaking) but show clearly in Google’s cache. You may also see a “this site may be hacked” warning under your search listing.
The WordPress pharma hack is an SEO-spam compromise that injects pharmaceutical pages and links into your files and database, often using base64-encoded payloads. It poisons your search rankings — the real business cost is the lost Google traffic, not visible defacement.
5-step removal:
- Confirm the infection. Run a
site:yourdomain.comsearch in Google. Note any pharma-keyword pages that appear. Open one in Google’s cache (the small arrow next to the URL) — the cached version will show the spam even if direct visits don’t. - Search files for base64. Use the File Manager search or SSH
grep -r "base64_decode" wp-content/to find encoded payloads. They typically live inwp-content/themes/,/functions.php wp-content/plugins/, or in newly created PHP files in/ wp-content/uploads/. - Inspect the database. In phpMyAdmin, search the
wp_optionstable for suspicious entries — attackers stash payloads in_transient_*and custom option keys. Searchwp_postsforpost_status = 'publish'rows you didn’t create. - Replace core and active theme files. Download a fresh copy of your active theme from the official source. Replace
functions.php,header.php,footer.php, and any modified template files via SFTP. - Submit a reconsideration request. Once clean, open Google Search Console → Security & Manual Actions → Security Issues, click Request a Review, and describe the cleanup. Without this step, your search traffic stays gone.
JavaScript Redirect Malware: Mobile Visitors Sent Elsewhere
Symptoms. Visitors report being redirected to scam, adult, or fake-prize sites — but only on mobile. The desktop view looks normal. The redirect may fire only on the first visit per device (cookie-based) or only from Google referrals. WhatsApp link previews show the wrong page. Hosting support flags outbound traffic anomalies.
JavaScript redirect malware on WordPress typically targets mobile visitors only and embeds injected scripts in functions.php, header.php, or in the wp_options siteurl/home values. It’s a common variant of SEO-spam infections that survives backup restores if the injection point is missed. This pattern is brutal for Ghana businesses — your WhatsApp customer flow breaks silently because the link in your bio sends mobile visitors to a phishing page.
5-step removal:
- Reproduce the redirect. Open your site on a mobile data connection (not WiFi) in an incognito tab. Confirm where the redirect lands. Capture the destination URL — you’ll need it to identify the malware family.
- Check
wp_optionsfirst. In phpMyAdmin, runSELECT * FROM wp_options WHERE option_name IN ('siteurl', 'home');. If either points anywhere other than your real domain, that’s the attacker’s edit. Restore them to your actual URL. - Audit theme files for injected JS. Open
functions.php,header.php, and anyinc/*.phpfiles in your active theme. Look for
